1
2
3
4
5
6
7
8
9
10
11
12
13
14
15
16
17
18
19
20
21
22
23
24
25
26
27
28
29
30
31
32
33
34
35
36
37
38
39
40
41
42
43
44
45
46
47
48
49
50
51
52
53
54
55
56
57
58
59
60
61
62
63
64
65
66
67
68
69
70
71
72
73
74
75
76
77
78
79
80
81
82
83
84
85
86
87
88
89
90
91
92
93
94
95
96
97
98
99
100
101
102
103
104
105
106
107
108
109
110
111
112
113
114
115
116
117
118
119
120
121
122
123
124
125
126
127
128
129
130
131
| import os
import sys
import torch
import tkinter,pyautogui,time,win32gui,win32con
from models.common import DetectMultiBackend
from utils.dataloaders import LoadScreenshots
from utils.general import check_img_size, non_max_suppression, scale_boxes, xyxy2xywh
from utils.torch_utils import select_device
from pathlib import Path
from logie_g1 import RunMovingTo
import cv2
FILE = Path(__file__).resolve()
ROOT = FILE.parents[0] # YOLOv5 root directory
if str(ROOT) not in sys.path:
sys.path.append(str(ROOT)) # add ROOT to PATH
ROOT = Path(os.path.relpath(ROOT, Path.cwd())) # relative
def run(
weights=ROOT / 'yolov5s.pt', # model path or triton URL
# source=ROOT / 'data/images', # file/dir/URL/glob/screen/0(webcam)
source=ROOT / 'cs_black.mp4', # file/dir/URL/glob/screen/0(webcam)
data=ROOT / 'data/coco128.yaml', # dataset.yaml path
imgsz=(640,640), # inference size (height, width)
# conf_thres=0.55, # confidence threshold
conf_thres=0.75, # confidence threshold
iou_thres=0.15, # NMS IOU threshold
# iou_thres=0.45, # NMS IOU threshold
max_det=1000, # maximum detections per image
device='', # cuda device, i.e. 0 or 0,1,2,3 or cpu
classes=None, # filter by class: --class 0, or --class 0 2 3
agnostic_nms=False, # class-agnostic NMS
augment=False, # augmented inference
visualize=False, # visualize features
half=False, # use FP16 half-precision inference
dnn=False, # use OpenCV DNN for ONNX inference
):
device = select_device(device)
model = DetectMultiBackend(weights, device=device, dnn=dnn, data=data, fp16=half)
stride, names, pt = model.stride, model.names, model.pt
imgsz = check_img_size(imgsz, s=stride)
shot_width,shot_height = get_resolution()
dataset = LoadScreenshots(source, img_size=imgsz, stride=stride, auto=pt)
for path, im, im0s, vid_cap, s in dataset:
aims = []
im = torch.from_numpy(im).to(model.device)
im = im.half() if model.fp16 else im.float()
im /= 255
if len(im.shape) == 3:
im = im[None]
pred = model(im, augment=augment, visualize=visualize)
pred = non_max_suppression(pred, conf_thres, iou_thres, classes, agnostic_nms, max_det=max_det)
for i, det in enumerate(pred):
im0 = im0s.copy()
gn = torch.tensor(im0.shape)[[1, 0, 1, 0]]
if len(det):
det[:, :4] = scale_boxes(im.shape[2:], det[:, :4], im0.shape).round()
for *xyxy, conf, cls in reversed(det):
xywh = (xyxy2xywh(torch.tensor(xyxy).view(1, 4)) / gn).view(-1).tolist()
line = (cls, *xywh)
# print(('%g ' * len(line)).rstrip() % line,xywh,type(xywh))
# if cls!=0:
# continue
# just_head
if cls==0 or cls == 2:
continue
aims.append(line)
# #this for moving mouse
current_x,current_y = pyautogui.position()
aim = get_nearest_center_aim(aims, current_x , current_y, shot_width, shot_height)
try:
movx,movy = calculate_mouse_offset(aim,current_x,current_y,shot_width,shot_height)
except:
movx,movy = (0,0)
run_lgt = RunMovingTo(int(movx*0.6),int(movy*0.6))
#print(type(run_lgt))
run_lgt.quick_move()
def get_nearest_center_aim(aims, current_mouse_x, current_mouse_y, shot_width, shot_height):
"""筛选离鼠标最近的label"""
dist_list = []
aims_copy = aims.copy()
aims_copy = [x for x in aims_copy]
if len(aims_copy) == 0:
return
for det in aims_copy:
_, x_c, y_c, _, _ = det
# dist = (shot_width * float(x_c) - current_mouse_x) ** 2 + (shot_height * float(y_c) - current_mouse_y) ** 2
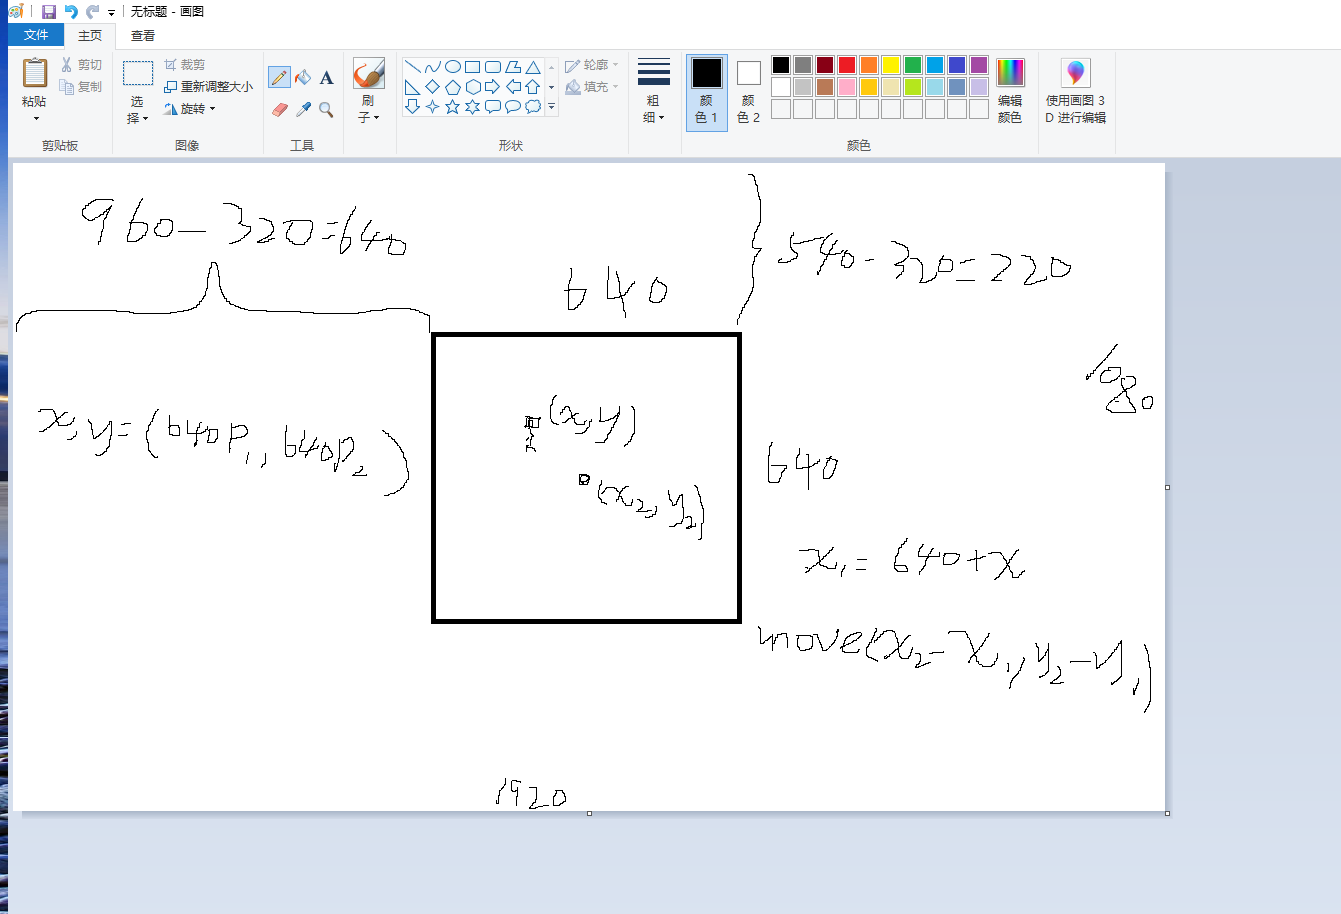
#640*640
dist = (640 * float(x_c) - 320) ** 2 + (640 * float(y_c) - 320) ** 2
# #320*320
# dist = (320 * float(x_c) - 160) ** 2 + (320 * float(y_c) - 160) ** 2
dist_list.append(dist)
return aims_copy[dist_list.index(min(dist_list))]
def calculate_mouse_offset(aim, current_x, current_y,shot_width,shot_height):
# print(aim,"this is aim!!!",type(aim))
tag, target_x, target_y, target_width, target_height = aim
# movex,movey = target_x*shot_width-current_x,target_y*shot_height-current_y
# print(target_x,target_y,resolution_x//2,resolution_x//2,movex,movey)
#640*640
tarx,tary = (target_x*640+640),(target_y*640+220)
# #320*320
# tarx,tary = (target_x*320+800),(target_y*320+380)
movex,movey = tarx-current_x,tary-current_y
return movex,movey
def get_resolution():
"""获取屏幕分辨率"""
screen = tkinter.Tk()
resolution_x = screen.winfo_screenwidth()
resolution_y = screen.winfo_screenheight()
screen.destroy()
return resolution_x, resolution_y
if __name__ == '__main__':
# run(weights="./runs/train/exp5/weights/best.pt",source="screen 0 0 0 1920 1080")
# run(weights="./yolov5s.pt",source="screen 0 640 220 640 640")
# run(weights="./yolov5s.pt",source="screen 0 800 380 320 320")
# #640*640
# run(weights="./csmodel.engine",source="screen 0 640 220 640 640")
run(weights="./yolov5s.pt",source="screen 0 640 220 640 640")
# #320*320
# run(weights="./csmodel.engine",source="screen 0 800 380 320 320")
|
